I took time to refresh my Raspberry PI GIT server. I am still using the v1 board, but with a few upgrades and modifications. It was more to streamline the entire package instead of performance upgrades.
Changes:
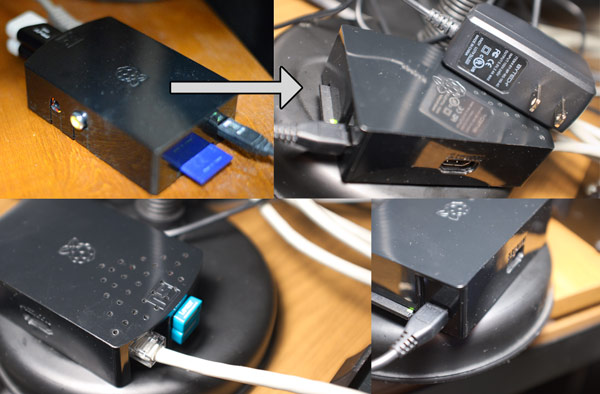
– I bought a half-height SD to Micro SD adapter. This makes it stick out less from the case. Sadly it’s not totally flush, but better at least. Along with that I upgraded to a 64GB micro SD card from a 32GB SD card.
– I upgraded the backup drives with 64GB Lexar JumpDrives (S45 LJDS45-64GABNL). They are super compact and had decent reviews. I decided to skip the RAID 01 mirroring approach with these. It simplifies things and there really isn’t any drawback besides maybe hot swap (which I don’t think would work because fstab uses unique drive identifiers).
– I picked up another power supply on a whim when I saw it at the store “Five Below” for a great price. This again streamlines things over my previous setup that was combo type where you would plug in a USB cable into the unit. In this case it’s one single piece. The maximum amp rating on it is 2.4 amps, which is great for $5.
– I drilled vent holes into the top case as seen in the photos. I might add more in the future, but I thought at least a few would be good.
Anything over 32GB will require an extra formatting step detailed here. The current install takes the user directly to the GUI operating system after it is finished setting things up. You need to go into the start (raspberry) button >> “Preferences” >> “Raspberry Pi Configuration” to find options. From there you can switch it up to boot from the command line instead of the GUI.
Once you are at a command prompt you can do this to enable SSH:
– Enter sudo raspi-config in a terminal window
– Select Interfacing Options
– Navigate to and select SSH
– Choose Yes
– Select Ok
– Choose Finish
Once you are setup, you can slim down what NOOBS pre-installs into the OS thanks to this person who made this script.
Download PuTTY for SSH (used for the remote command line interface):
http://www.putty.org/
A Windows installer for everything except PuTTYtel
Download and install Window GIT:
https://git-for-windows.github.io/
Download and install Tortoise GIT:
https://tortoisegit.org/
Linking RP and your client with source code:
Create the local repository by adding a folder to your computer and right-clicking on it and selecting “Git create repository here…” from the context menu. Have it make a standard setup (not bare).
Generate your SSH keys:
Use Puttygen to make the keys, save both the public and private keys. Name the private key with a .ppk extension.
Seems to be optional if you do everything on the same local network.
SSH to your pi:
1. install git to your pi (Should be installed, but doing it won't hurt)
sudo apt-get install git git-core
2. add a user 'git', or you can use other name
sudo adduser --system --shell /bin/bash --gecos 'git version control by pi' --group --home /home/git git
3. set the password for the new user
sudo passwd git
4. use the user 'git' to make an empty repository
su git
cd /home/git
mkdir repo.git
cd repo.git
git --bare init
Back to your working machine where you have a folder you want to push to the new GIT server:
You can use TortoiseGit to set things up.
Right-click on the main folder. Select Git Create Repository here.
Right-click >> TortoiseGIT >> Settings >> Remote…
From there you can add server details.
Remote: A name you want to call it.
URL: something like git@X.X.X.X:repo.git
Where X.X.X.X would be the IP address of the new server on your local network.
The Push URL is the same as the URL.
All of the other options can be left default unless you made a Putty Key earlier.
Setup the backup drives:
Prepare directories that you will mount your drives to.
sudo mkdir /media/usbdrive
sudo chown -R git:git /media/usbdrive
sudo chmod -R 775 /media/usbdrive
sudo setfacl -Rdm g:git:rwx /media/usbdrive
sudo setfacl -Rm g:git:rwx /media/usbdrive
sudo mkdir /media/usbdrive2
sudo chown -R git:git /media/usbdrive2
sudo chmod -R 775 /media/usbdrive2
sudo setfacl -Rdm g:git:rwx /media/usbdrive2
sudo setfacl -Rm g:git:rwx /media/usbdrive2Code language: Bash (bash)
Figure out your USB drive IDs:
sudo blkid
(or)
ls -l /dev/disk/by-uuid/
You should see your two USB drives (sda1 and sdb1) with identifiers like XXXX-XXXX. Those are the unique IDs that we use in fstab to mount the drives. blkid will give you the type of formatting. In my case it is vfat.
Optionally, you might need different drivers that you can install such as ntfs or exfat:
sudo apt-get install ntfs-3g -y
sudo apt-get install exfat-utils -y
sudo pico /etc/fstab and add a line for each drive:

UUID=AAAA-AAAA  /media/usbdrive vfat    nofail,uid=git,gid=git   0   0
UUID=BBBB-BBBB  /media/usbdrive2 vfat    nofail,uid=git,gid=git   0   0
Code language: Bash (bash)
This should get them mounted without a reboot:
sudo mount -a
Setup crontab tasks:
crontab -e
10 * * * * /usr/bin/rsync -av -delete /home/git/repo.git/ /media/usbdrive/repo.git/ --log-file=/home/git/rc1.log
15 * * * * /usr/bin/rsync -av /home/git/repo.git/ /media/usbdrive2/repo.git/ --log-file=/home/git/rc2.log
Code language: Bash (bash)
I run a rsync task for each backup drive. The first drive will be a true mirror and the second drive will be a mirror but keep *everything* that was ever added in case the main drive ever goes bad and tries to push deletes to the backups. The only issue could be drive space, but I am not using much. If it ever became an issue, I’d just upgrade the drives again.
I switched from Unison to rsync. It’s a lot simpler to use and doesn’t run the risk of back pushing changes (eg. deleting your source code if a backup drive has issues or is accidentally cleared)
That should be about it.
————————————————
Here are some useful commands:
Calculate the size of a directory:
du -sh /home/git/repo.git
To view mail from crontab:
cat /var/spool/mail/pi